
If you'd like to see more pictures of it first, I posted plenty HERE!
What you need:
- Knit fabric with plenty of stretch, or anything else with plenty of stretch I guess.Mine was 1,25 m wide and I had 1,5 meters and I used it up almost entirely. I usually wear size 36 or S. This pattern depends GREATLY on how much stretch your fabric has. I am giving you my numbers, but make sure to always double check your own.
- You need the body you'll be making it for :-) Either yourself, a dress form, or the person who will get it. This isn't a cut out paper pattern, or only parts of it. Some will get fitted on a body or dress form directly.
- A sewing machine and preferably a serger, too, but of course you can just use zig-zag on your regular machine if you don't have a serger...
- a small amount of satin tape or anything else you'd like to use for the shoulder "strap" in the back, as well as for the little finishing tags center front and back (in my case, the bright green bits)
- As always: scissors, measuring tape, thread and all that good stuff in your sewing kit.
STEP 1: Taking measurements and making/cutting the top pattern
You only need three measurements:

- Red: From your waist (or wherever you want the skirt part to start) up to where you want your lowest neck point to be. In my case, this line was about 40 cm (16 inches)
- Blue: from the neck point up to the shoulder point. In my case: 20 cm (8 inches)
- Green: From center front waist (or center at the height of where you want your skirt part to be attached) to the side, then add about 7cm (3 inches). Easier said: 1/4 of you waist measurement plus an extra 7 cm/3 in. In my case: 25 cm (10 inches)
The black dotted lines are how the rest of the pattern will come together. You could also make the sleeves wider - like the dotted orange lines - if for example you have a fabric with too little stretch for my version. However, with the stripes in my case, I had to have a 90º angle between the blue and the black lines. (If you have stripes but still want the wider sleeve, you can just add a shoulder seam instead of cutting it on the fold.) You might want to test your fabric a bit before cutting into it. See, I can still lift my arms way up, because it is a very loose, stretchy knit (of course, the sleeves slide back, too...):

Draw your pattern, starting with the red line, then in a 90º angle the green, and in a 135º angle the blue line. Now from the green line in a 135º angle a line, which will cross the line you draw from the blue line in a 90º angle. DONE!

You will cut that ON THE FOLD as indicated, and you need to cut it twice. If you do a striped version like me, pay attention to the direction of the stripes...:

STEP 2: Sewing the top
There isn't much sewing to do. If you have a serger, serge the left and right bodice pieces together by the center front and center back seam (which was the red line on the pattern). Otherwise use a slight zig-zag, so it stays elastic.
With knit fabric, seam finishing isn't a must, and I left my edges raw. You can give the edges a good tug which makes them roll nicely!

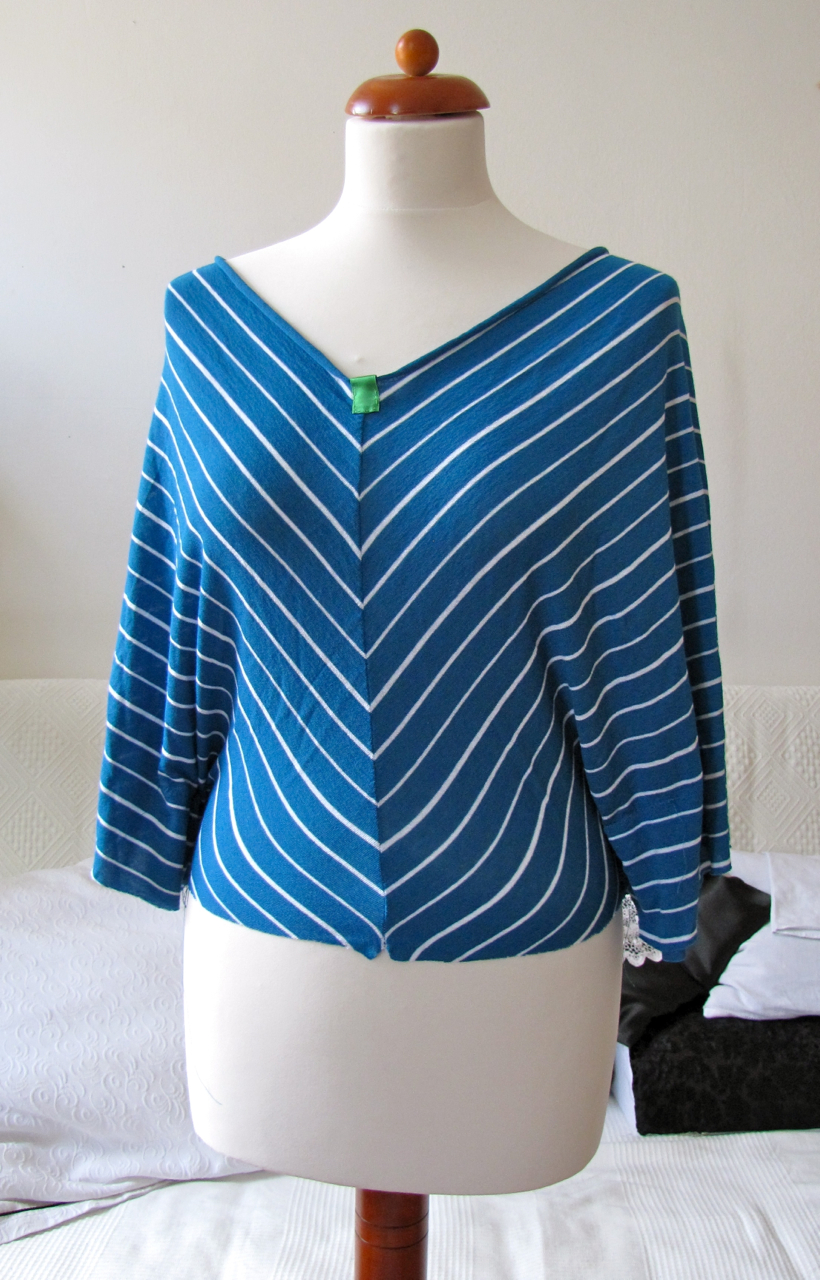
Now you see why I added that little green tag: to cover up the seam that is now rolling to the outside. Do that in the front and in the back (but only sew it at the lower edges, so that the fabric underneath can still do the rolling-action).
Then add the shoulder band. This doesn't have to be exactly half way between front and back. Mine is a bit farther to the back. Try it on, check what's best for you! And also play with the length you want. Mine is about 25 cm long (10 inches). Again, don't sew this directly to the edge of the fabric, but give it a bit of room to do the rolling-action.

While still wearing it, also measure how wide your top part should be at the waist and mark. Make it quite tight, but still comfortable. This is one of those things that will greatly depend on how stretchy your fabric is. IMPORTANT: Make sure you can still put on your dress! There is no zipper or back/side closure intended, so it need to fit tightly enough yet still have stretch enough to be put on over your head or hips!
Do you see the pins in the picture below? They run to that point at the waistline you just marked.

The rest of the pins is there because you will be sewing the sleeves together along that line. You can see it better in the sketch below, it's the orange lines with the zig-zag indicated. Because you'll sew it with a zigzag, so it stays elastic...
My orange line was about 18 cm long (7 inches). You can also not sew the sleeves together at all, just be aware that there will be a lot of "insight" from the sides if you lift your arms. :-)

You are done with the top! I actually like it just as a top, too...
STEP 3: Making the skirt
Take the rest of your fabric and wrap it around yourself, stripes going cross-wise. Hold it to your waist quite tightly, stretching it to fit snuggly. Don't worry, we will leave room for your behind :-)
Mark point x:


Let the remaining width of the fabric hang down and decide how you want the hot pink line in the sketch below to run. It's the length of the skirt at that point, so be sure it's long enough, but the rest of the skirt can be longer (as it is in my case). Also note that this line will decide the width of your skirt at the hem and around your behind. In the photo, that safety pin at the hem indicates where my line ended...
(The curved blue line at the bottom in the sketch is how the skirt will be cut later, just so this sketch is easier to understand)


Again, use a slight zig-zag stitch.
STEP 4: Finishing
Now all you need to do is sew the skirt and top part together. Decide where you want the loose ends of the skirt to be and pin together with right sides facing each other. The waist widths should be about the same on top and skirt part, but if it is slightly off, it's no big deal, as we have stretch fabric... I used my serger.
Then even out the hem. Easiest with one of these nifty inventions:

The stripes will only run parallel to the ground in the back. Don't let that confuse you. It is like that due to the anatomy of the pattern. Simply cut the hem... I did't finish it, just let it raw.
Lastly I rounded off the sleeve part of the top:

Done!

As mentioned before, more pictures of the finished dress are in THIS POST.

All the best to you,
Katja
This is gorgeous. Thanks for the tutorial.
ReplyDeleteWhat a cute dress and thorough tutorial! I really appreciate a blogger who gives thorough directions and pictures :)
ReplyDelete:-) Kann ich Dich bitten, dieses Kleid bei Meike (crafteln.de) zum Streifenmonat Juli einzustellen, bitte?!
ReplyDeleteGreat tutorial, thanks!
ReplyDeleteThank you i really enjoyed reading. I love the style, something i will make. Thanks
ReplyDeletedeine schnitte sind wunderbar geometrisch und übersichtlich. ich werde versuchen, was nachzunähen und meld mich dann ;)
ReplyDeletebis dahin schau ich immer mal vorbei...
herzlich birgit
Thank you for sharing....this is a nice dress and a good addition to the many maxi skirts i've made....;)
ReplyDeleteGorgeous dress!!! love how it fits you! thanks for sharing
ReplyDeleteFantastich & einmalig schön! I featured your groovy creation on my blog: http://awesomesauceasshattery.wordpress.com/2012/07/10/sommer-in-der-stadt/
ReplyDeletewoW, your dress is elegantly casual, simple...just the best! thank you for your post!
ReplyDeleteI absolutely love your site! I'm so glad I found it. You make it look so easy, I will have to try to make some of the patterns. Thanx!
ReplyDeletedefinitely have to give this a try! great summer dress!
ReplyDeleteOh ja, freue mich immer über solche Rückmeldungen, und über Nach-Genähtes besonders!
ReplyDeletei TOTALLY FAILED
ReplyDeleteLOL
Oh no, seriously? Why, what happened? I would like to know, so I can improve my instructions...
ReplyDeleteAmazing dress, I've just ordered my fabric! I'm confused about a couple of steps with the skirt though. Did you cut through both ends of the fabric along the pink line? Also the blue line? Lastly, do the loose bits remain hanging as they are or did you sew them?
ReplyDeleteThanks in advance.
You are awesome! I'm sure I could make this dress, but every thing you make, you make look so easy. I'd love to try the top turned pants, but I'm sure it took hours, and I so dang busy with work. Again- you're a creative genius!
ReplyDeleteI am completely confused abt how to sew the skirt part too! Was following perfectly right up to then. Unclear where to cut and where to sew. Please help! And if the top part (the lime where you attach it to the dress top) is snug around the waist then how do we put it on? I'd love to make this but don't get the skirt at all. Thank you!
ReplyDeletethe pink line is the side seam of the skirt, you cut and sew there, and the blue line is the length where the skirt is hemmed
ReplyDelete